-2.png?height=120&name=EDITED%20Logo%20Dark%20-%20Color%20(1)-2.png)
Task List Details
The Task detail screen can be accessed via the “Tasks” tab within the appropriate opportunity list or by clicking the desired task from the Calendar or List view of the Task Summary.
The Task detail screen communicates all information that was entered at task creation along with the ability to edit any of the fields. For example, users may wish to re-assign to a new owner or change the dates expected for the task work. The user may also edit the filter to narrow the list further or perhaps expand it to include more items.
You will find a “Labels” option to enter one or more descriptive labels. These labels might define a specific department, the type of data within the task, co-worker name, vendors or other. Once labeled, you may not search the Task List page or filter the Task calendar on your selection.
Users will also find a “following” feature. Task followers will receive email notifications for key task changes. For example, users will be notified when the task is closed, actioned, re-assigned or the due date moves. Common task followers are the managers of the task owners and/or co-workers that are impacted by the task.
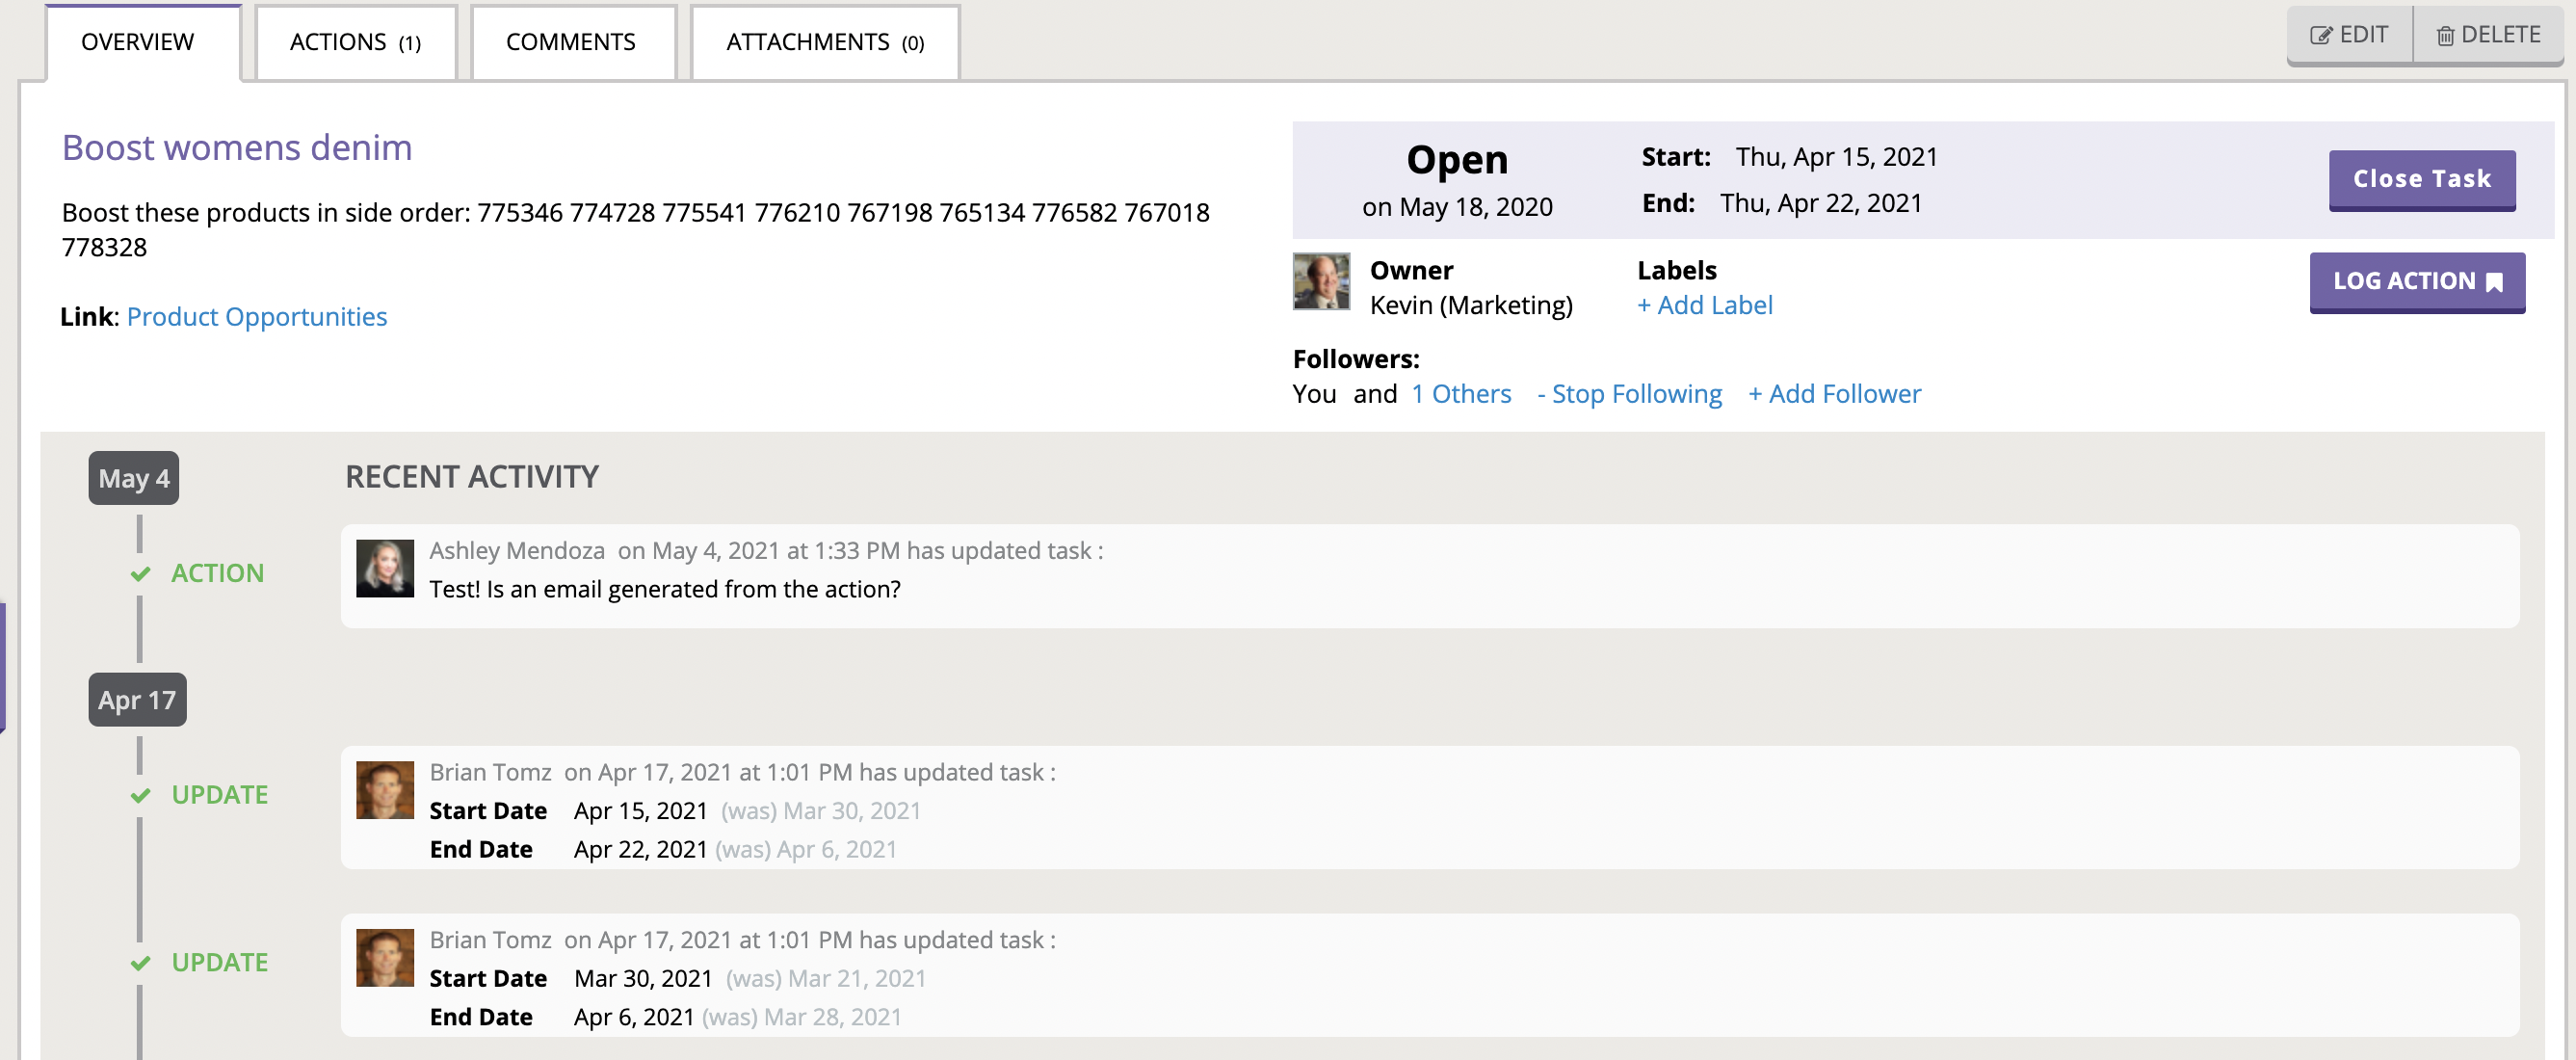
At the bottom of the screen, users find a summary of recent activity. The Actions tab communicates all actions that have been documented for the task (see Actions section below). A comments tab is provided to facilitate dialogue between co-workers or notes that the task owner wants to log. The activity tab chronologically communicates changes and updates to the task and the attachments tab provides a facility to upload and download attachments. Common use cases for attachments include screen shots of key web site pages, status tracking spreadsheets or in progress presentations.
When a task is complete, users should close the task to indicate that an action was taken.
Task Creation
If you are creating a task from an opportunity list and want to task all items that appear in the list, simply click the “Create Task” button. If instead, you wish to create a task with just a subset of the items, you will first want to apply a filter to the opportunity list. For example, you may only want items that match Brand X or items that match AdGroup A or B and are above $100 in potential profit. After applying your filter, click the “Create Task” button and the task will inherit the filter. The screen will ask you for a task name, a date range associated with the tasked work, a description of the action you intend to take, and a selection of the task owner. You may also optionally upload attachments that you believe will help the task owner (e.g. screen shots or spreadsheets). The grid at the bottom of the Create menu summarizes the items that belong to the task.
Independent Tasks
We expect most tasks to be created from an opportunity list. Nevertheless, a option is included in these screens. Upon selection, users have the option to navigate to an Opportunity list and create a task from there or to create an “Independent” task. Independent tasks are not tied to a specific opportunity. These are intended for general use. For example, you may want to create a task that address issues across multiple lists or you may want a task that serves as a reminder (e.g. Call Brand X to lobby for a larger trade promotion budget.)
Task Activity
The Task Activity view summarizes all of the activity sorted by the most recent task changes. Activity information would include task re-assignment, task comments, task date changes and more.
Task Lists
The Task List view provides the same information, but in list form. This view is helpful when searching for specific tasks or wanting to filter on fields such as “Opportunity” or “Labels.”
From this screen, you may also delete multiple tasks by selecting multiple check boxes and clicking the delete button.
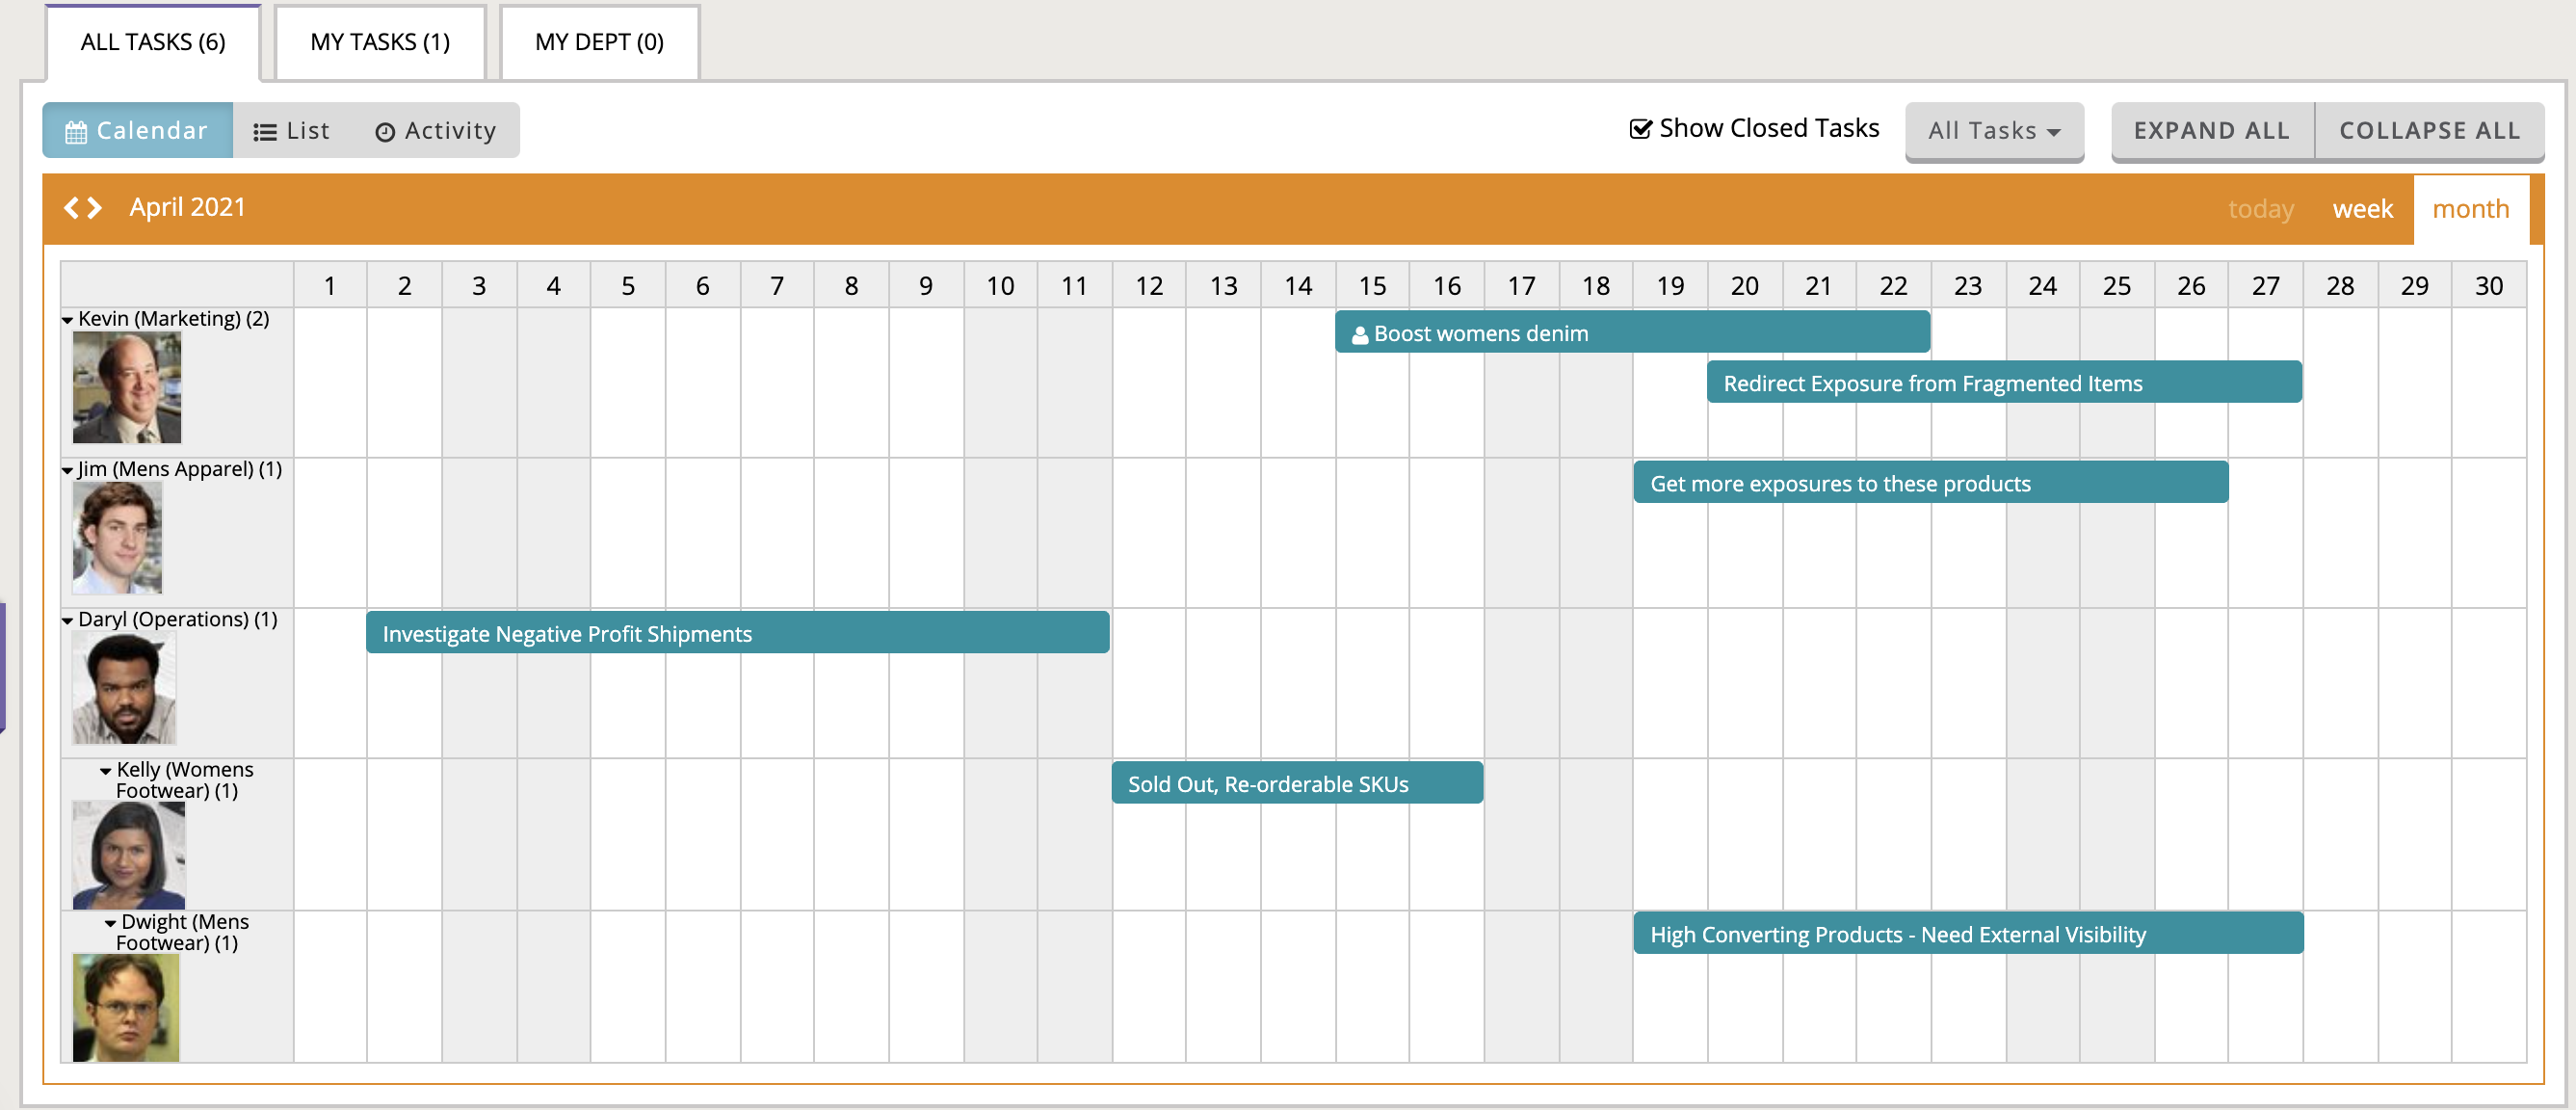
Task Calendar
The Task Calendar screen summarizes all open and closed tasks. The calendar view is organized by user and lists all tasks assigned to that user during the viewed time range. You can navigate the calendar via the arrows to the left and right of the date range or toggle between week and month views. To change the task date range, simply grab the grippers on the end of each task and drag right or left. You may also drag the task to another user to re-assign it. Clicking a task bar will provide a pop-up with more description and navigation options. For all Task views, you may toggle between:
- “All Tasks” shows you all tasks.
- “My tasks” limits the view to only tasks assigned to you and those that you are “following.”
- “My Dept” limits the view to only tasks assigned to members matching your department. Your department is defined in “My Profile.”
- You may also narrow your task view by filtering on free form “Labels” that have been applied to Tasks.
Action List and Logging
The Action logging feature allows you to document any actions that you have taken on a task. For example, you may be working a task and want to…
- Document specific keywords along with the date on which you have changed your bid by x%.
- Document which products along with the date for which you changed the price from x to y.
- Document which products along with the date and quantity for which you placed a new purchase order.
- Document which landing pages along with the date for which you updated the content
- Document which product detail pages along with the date for which you updated the description
To log an action, click the “Log Action” button at the top of each task.
An Actions tab within each task summarizes the actions taken on the task.
Action List
The Action List link from the Left Navigation summarizes all actions across all tasks. Click “Group By Action” owner to quickly view actions by the action taker.